


And some stuff to go in my shop:


I've been so busy with custom orders and other holiday busy-ness that I scarcely have time to write a complete paragraph.
More than anything I just wanted to wish you all a very Happy Thanksgiving! :)

 Some Itty Bitty Ami Bears sitting in their origami gift bags . . .
 And a trio of Bashful Blooming Cacti. Each cactus will now come with an instructional "How to Care for . . . " hang tag. It's an idea that I've been mulling over for ages and I've finally gotten around to doing it.
 The tags read --
 I know, I know . . . they're just potholders, but they're cherry potholders so that's sort of cute, right? But then I discovered some cherry print fabric so I plan to make a whole cherry themed kitchen set. This project is still in the beginning stages so I have hopes that it will blossom into something more impressive than it seems. We'll see, I guess. Stay tuned . . .
 Yep, it's my trusty ol' Happy Swirly Cupcakes. If you've been keeping abreast of my blog posts you'll notice that I've been making mini versions of my usual amigurumi. I just love jamming a whole lotta cute into a small package. It's like concentrated cuteness! :) I suppose it was only a matter of time until my big cupcakes got the shrinking treatment, too.
 Here's a shot of one of my big cupcakes next to it's baby sibling.
 And another comparison shot of the cupcake tops. Although I love the look of the swirly frosted, berry tops on the bigger cupcakes, I've been dying to make some frosted sprinkle cupcakes for the longest time, and so I've done on the smaller counterparts.
 Here are a pair of Bashful Blooming Cacti.
 And a plush Apple Cheek Ami Bear and Bunny duo.
 Finally, I made this sweet Itty Bitty Ami Bear twosome.
 I thought I'd throw in a random shot of the big ami bear next to the mini one. I just wanted to take a photo for comparison, but it gave me the idea of doing a set -- like a little bear holding her little toy bear. Maybe that will be my next project! :)
 Now before I leave . . . this month's Reader Appreciation Giveway are these two adorable Japanese fabric iron-ons. Isn't that blue elephant sweet? Apply them to your tote bag or backpack for instant cuteness! As always I will pick someone at random from the comment pool of this post.
 I made them in a bunch of different colors as you can see. They'll be listed in my shop shortly, if anyone is interested.
 Do you remember these? I haven't made my Sundae Berets in quite awhile. I used to make them with nuts scattered all over the hot fudge sauce, but this time I decided to do them up with colored sprinkles. I saw something on Food Network about how sprinkles were one of the most popular toppings for ice cream, and I was instantly inspired.
 Here's one of my B-gals wearing one. I'll be putting a bunch of these in my shop, too.
 I make a Sweet Apple Cheek Ami Bear! These little girls began life as amigurumi bunnies until I realized that there wasn't enough yarn left in the skein for their big ears and pom-pom tails. I've never made an amigurumi bear before so this was a new adventure for me.
 I did a lot of sketching in my trusty doodle notebook before I found a bear head that felt right to me. You'd be surprised by how dramatic a simple bear face can change just by altering the size of the nose or the placement of the ears.
 Here is another shot of them wearing the other side of their reversible apron dresses.
 Speaking of the shop, the last of the Blythe Bouncy Bunny Ear Hoods will go in, too. It's not the last hoods forever, but certainly the last for awhile (unless somone makes a special request because I always oblige). It's just that I have so many exciting project ideas whirling around in my head that I need to get to before they dissipate.
 Finally, to anyone else that shares a birthday in April with me -- HAPPY BIRTH MONTH!!! :)
 I told myself I would not make any more of these because they are a bit difficult to sew, but I only had about 1/4 yard of the faux wool fabric left over, and in my never ending quest to use what I have, I decided to just go for it and use it all up. Goodbye Woolly Fabric! My sewing machine and I won't miss wrestling with your darn poofy-ness!
 I haven't made any Happy Swirly Cupcakes in awhile so I whipped some up for the shop. I used to do the cup parts in all sorts of colors, but now I think I'll stick with yellow. It just looks more cake-y to me. I think yellow is a wonderfully edible looking color as opposed to pink or blue or what-not. Also, the blush really pops on a yellow face. I'll save the bright colors for the frosting.
 Materials:
 Step 2. Using your tin as a template, trace around it onto the back of the magnetic strips/ sheet. ( My magnet came in a sheet that you can break apart into strips, but I kept it together in a solid sheet.)
 Yippee! Now you have a place to hold your pins and needles!
 "Star"
 "Scout"
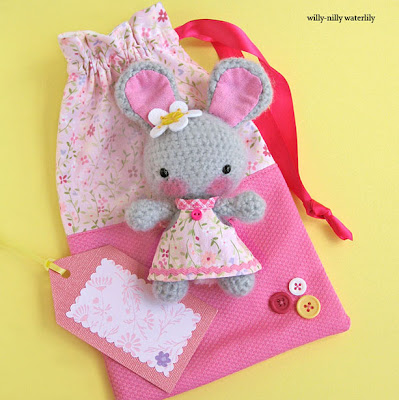
 Then I turned it up as far as their outfits go by giving their dresses details like vintage ric-rac and hand embroidery. I crocheted little bags for them to match their outfits. The flowers by their ears were reworked completely with stitch pleated petals and Japanese ume (plum blossom) centers.
 I solidified their uniqueness by doing a little mixed media (watercolor, colored pencil, ink) painting of them with their names written on it. Sort of like a trading card.
 Finally, I stitched up matching fully lined drawstring bags to tuck them away in.
 Despite extensive struggling with the poofy faux wool fabric, I managed to whip up three Blythe Woolly Lamb Hoods. I intended to make four, but after two broken needles and countless fits of cursing I decided to end the battle early.
 I did get a pinch of joy from using my new Japanese fabrics. There is nothing more satisfying to this crafter than cutting into a crisp piece of freshly purchased fabric. My favorite hood by far is the one lined with the pink kawaii fruit fabric -- to match the fabric's theme, instead of a flower by the ear, I crocheted twin little cherries with dual stems and leaves.
 Lately, I've been trying to adopt the "use what you have" mentality and the craft item I have been trying to get rid of was my extensive collection of origami paper. After much brainstorming I came up with this idea -- folding them into little envelopes, filling them with stickers, and stamping a little "For You" message on the back. But whatever for, you ask? Well, I plan to give these as an extra little thank you gift with each purchase at my shop.
 Step 5. Fold the right corner of the uppermost flap back towards the left edge.
 March's Reader Appreciation Giveaway is this very cute puffy paper doll sticker set. The sweet, little girl has an extra dress to change into and lots of food for her to eat. As always , I will randomly choose someone from the comment pool at this post and announce the winner in my next post.
 The major one being an army of Bashful Blooming Cacti. Some are custom orders and some will be going to my Etsy shop soon.
 Yayy! They have official tags now! :)
 During one of my lazier crafting days I decided to make these little "thank you" tags. I've never been much of a stamper/ paper crafter as sewing and crocheting are my cup of tea, so I was surprised that I got such a kick out of making these. There's something very nostalgic about sitting at your desk and cutting paper and gluing pieces of it here and there. It reminded me of being in grade school and making Valentine's Day cards or construction paper chains for the class Christmas tree. Ahhhhh, childhood . . . . :)
 This week I visited my favorite fabric store on the island, Kaimuki Dry Goods, where I scored some sweet Japanese import fabrics. Just look at the yummy colors! I could not wait to start cutting into them!
 I'll end this post with a parting shot of my craft desk. Can you tell what I'm working on? If you guessed Blythe Wooly Lamb Hoods then pat yourself on the back! :) I'm not sure how successful it will turn out because the faux lamb's wool is rather thick and it's giving my poor Singer sewing machine a ghastly time of it. We'll see, I guess. If all goes well I should have a bunch in my Etsy shop soon.